Misadventures with Aquafaba
A couple of years ago, the vegan food world started going crazy over aquafaba. If you’re not yet acquainted with this magical liquid, aquafaba is simply the thick liquid that you drain off of cooked beans, and usually refers to the liquid from chickpeas.
Aquafaba can replace eggs in vegan baking, and can be whipped into fabulous vegan meringues and other desserts. New uses for aquafaba surface all the time, including vegan mayonnaise, butter, marshmallows, and even ice cream.
The name aquafaba, which literally means “bean water,” was coined in 2015 by Goose Wohlt. You can find the whole history on the aquafaba.com website.
In 2015, vegan food Facebook pages lit up with photo after photo of meringues made from aquafaba. I’m usually slow to hop on the vegan-food-trend bandwagon, and aquafaba was no exception. All the posts told me that you had to use aquafaba from canned chickpeas, which I don’t buy. I didn’t have the mixer required to whip up a meringue. Besides, meringues have never been high on my list of priorities.
I’ve actually been using aquafaba for years to thin hummus. While others add oil or water to their hummus, I’ve always kept mine oil free and used the chickpea liquid to achieve the right consistency. When I finally brought my Kitchen Aid mixer down from California to Guatemala, I decided to experiment with aquafaba meringue. My experiments usually turn out pretty well. Usually. Not this time.
Aquafaba From Home Cooked Beans
Since I don’t use canned beans, the first task was to find out how to use the liquid from chickpeas I cook myself. Turns out it’s really simple: after cooking the chickpeas, pour the liquid into a saucepan and continue cooking until it’s reduced by about 1/2. Cool and refrigerate. This gives you a nice, thick aquafaba, similar to what you find with canned beans.
The Meringue Test
I started with a recipe from the wonderful It Doesn’t Taste Like Chicken blog. The author, Sam Turnbull, does an excellent job of explaining the process, so I won’t repeat it here.
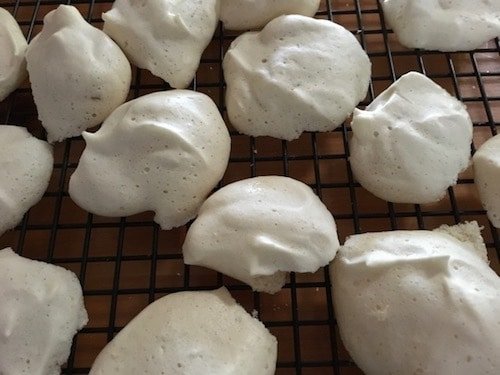
I was thrilled when I fired up my trusty mixer and whipped the aquafaba with some sugar, vanilla, and cream of tartar. Within a few minutes I had a beautiful meringue with stiff peaks. I put my dollops of meringue on cookie sheets lined with silicone baking liners. The result was… underwhelming.
The meringues stuck to the silicone liners. Maybe they would have peeled off more easily if I’d used parchment paper, but the bottoms of the meringues were pretty much glued to the liners. The top parts of the meringues were crisp and delicate, with no trace of chickpea flavor–really quite amazing. However, they were far too sweet for my taste.
I left the meringues out to cool. When I came back later, I found that they were no longer crisp and had started getting sticky. The air here is quite dry at this time of year, yet the meringues were pulling moisture from the air. A little quick research told me that letting the meringues cool in the oven is one way to keep them crisp. I threw the meringues into the fridge: the dry air of the fridge helped make them crisp again.
The Real Test
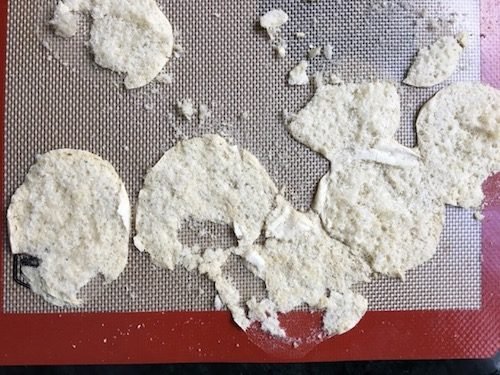
The next test was to have my husband try one. I don’t have much of a sweet tooth, but Mark does: he is my official dessert tester. Mark took one bite and said “Those are really sweet. They’re kinda weird.” Into the trash they went.
I’m certainly not done with my aquafaba experiments. If guests want a vegan lemon meringue pie, I’m prepared to make one. I’ll play with using aquafaba instead of flax seed as an egg replacer in waffles and cakes. I’ll try adding it to soups, as suggested in Cathy Fisher’s Straight Up Food cookbook. What I won’t do is throw out that chickpea cooking water!
Share this post!